Every product on your shelves came through the back door first. Before it was a sale, before it was stock on a shelf, it was a delivery: boxes on a hand truck, a driver with a clipboard, and a few minutes in which your money turned from a purchase order into physical inventory.
Most small retailers don’t treat receiving as a control point. They treat it as an interruption. The truck arrives during the lunch rush, someone signs the invoice, and the boxes get pushed into the back until there’s time to deal with them. That gap — between what the paperwork says you bought and what actually made it onto your shelves — is where inventory quietly leaks.
A case that never arrived but was paid for anyway. A damaged item that got shelved and marked down with nobody tracking the loss. A wrong item that sat in the back room for six months because nobody caught it on day one. None of these is dramatic. Each one is a small, silent loss, and over a year they add up to real money — the kind of unexplained shortage that makes owners suspect theft when the real cause was a sloppy receiving habit.
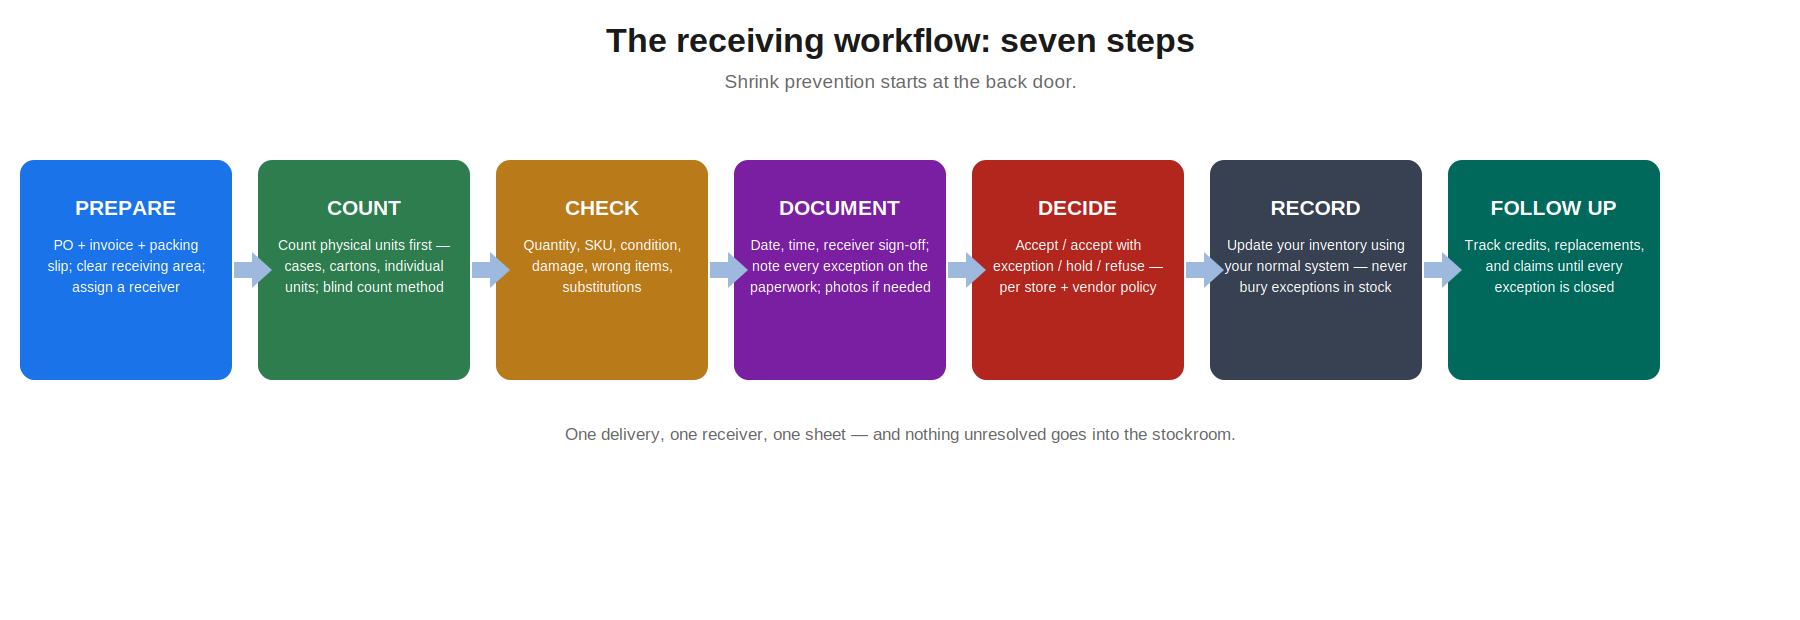
This guide covers retail store receiving procedures for small shops: a seven-step framework — Prepare, Count, Check, Document, Decide, Record, Follow Up — plus a usable receiving checklist, an exception decision tree, a low-staff version for owner-operated shops, and a worked hypothetical example. It covers exactly one thing: what happens in the minutes and hours after a vendor delivery arrives.
Why Receiving Deserves Its Own Procedure
When a delivery arrives, something important changes hands: responsibility. Up to the moment of delivery, the vendor is responsible for getting the right goods to you in good condition. From the moment you accept them, they’re yours — your stock, your money on the shelves, your problem if something’s missing. Exactly where that line falls depends on your vendor agreements and shipping terms, which is why this guide keeps returning to one rule: follow your vendor agreement and your store policy.
Once goods are shelved without being checked, every later question becomes unanswerable. Was the case short when it arrived, or did units disappear afterward? Was the item damaged in transit or in your stockroom? Without a receiving record, you’re guessing — and guesses don’t win credits from vendors.
Small stores are more exposed here than big chains, not less. A large retailer has a receiving dock, dedicated staff, and often automated matching of purchase orders to deliveries. You have a back room, whoever’s on shift, and a driver who wants a signature. That’s exactly why the procedure needs to be simple enough to survive a busy Tuesday.
Two boundaries keep this guide focused. First, receiving covers inventory entering the store — the delivery moment. Checking inventory that’s already on your shelves is cycle counting, a different job this guide doesn’t teach. Second, clean receiving records make later inventory questions easier to answer: when a discrepancy surfaces months later, you can rule out “it never arrived” with confidence instead of adding it to the mystery pile.
The principles here aren’t exotic — they scale down standard receiving guidance, such as the receiving procedures in NAMTA’s toolbox, to a store with no dock and no receiving department.
The Receiving Framework: Prepare → Count → Check → Document → Decide → Record → Follow Up
Every delivery gets the same seven steps, in the same order, owned by one person. The framework is deliberately simple — it has to work when the store is busy and the driver is waiting. Its single non-negotiable rule: nothing unresolved goes into the stockroom.
1. Prepare
Receiving starts before the truck arrives. Clear a spot where deliveries land — a marked corner of the back room, not the sales floor and not “wherever there’s space.” Deliveries that dissolve into the store before they’re checked are already half-lost.
Have your paperwork ready: the purchase order, the invoice, or the packing slip — whatever you have for that vendor. You should know what you’re expecting before the first box is opened.
Decide who receives. One person owns each delivery from arrival to sign-off, and their name goes on the receiving sheet. In a tiny shop that person might be you, the owner — the discipline matters more than the title.
Keep basic tools at the receiving spot: a pen, a copy of the receiving checklist later in this guide, a box cutter, and your phone for the occasional photo. And have somewhere to set aside exceptions — a marked shelf or taped-off corner — so problem items never mingle with good stock.
2. Count
Count the physical units before anything gets put away. This is the step most stores skip, and it’s the one that catches the most money.
Count what’s actually there — not what the paperwork says should be there (more on that in the blind-count section below). Distinguish cartons or cases from individual units: if the invoice says 12 cases, count 12 cases, then open one and confirm a case actually holds the quantity it should. Never assume the number printed on the outer label is correct; labels describe what was supposed to be packed.
If the driver is waiting, count at the door: cartons first, units after the driver leaves. A carton count takes seconds and establishes the most important fact — how much physically arrived. Write your count down before you compare it to the invoice. Memory is not a receiving system.
3. Check
With the count done, check what you received against what you ordered:
- Quantity: does the count match the paperwork?
- Item and SKU: is it the right product — right size, color, variant?
- Condition: visible damage — crushed cartons, water damage, broken seals, signs of tampering.
- Wrong items, missing units, substitutions: anything that doesn’t match the order.
- Date-sensitive goods: where relevant, check expiration or freshness dates and flag short-dated stock.
This is a surface check at the receiving moment, not a full quality inspection. You’re answering one question: does this delivery match the order, and is it in sellable condition? Anything that fails that test becomes an exception — documented in the next step, decided in the step after.
4. Document
Write it down. For every delivery, record what arrived, what didn’t match, the date and time of receipt, the delivery or invoice reference, and the receiver’s initials or signature. If you noted an exception on the invoice while the driver was present, keep a copy or photo of that marked invoice.
Take photos when they’re useful for claims or documentation — damage, wrong items, short cartons. You don’t need to photograph every routine delivery; photograph the exceptions, the things a vendor might dispute later.
The receiving checklist later in this guide gives you the exact fields. The principle is simple: if it isn’t written down, it didn’t happen. A month from now, “I’m pretty sure we were shorted on that delivery” is worth nothing. A dated sheet with the driver’s initials is worth a credit.
5. Decide
For each item or line on the delivery, make a decision: accept it into stock, accept it with a noted exception, hold it aside, refuse it, or escalate it to the owner or the vendor. The exception decision tree later in this guide walks through each case.
Two cautions. First, when an item is uncertain — a SKU you don’t recognize, goods you didn’t order — verify before recording. Never guess an unknown item into your inventory system; a wrong guess corrupts your records worse than a delay.
Second, refusing deliveries, claiming credits, and asserting rights over damaged goods all depend on your vendor agreements, contracts, and jurisdiction. There are no universal rules here, and this guide doesn’t invent any. Follow your vendor agreement and your store policy. When in doubt, hold the goods aside in their received condition and get guidance before acting.
6. Record
Update your inventory records using your store’s normal system — but only for what you actually accepted. Record the quantities you counted, not the quantities the invoice claimed.
Critically, keep unresolved exceptions out of your sellable stock. Physically separate held-aside items, mark them clearly with the date and reason, and make sure your records reflect that they are not available to sell. An exception that quietly melts into normal stock becomes an unexplained loss later — exactly the outcome this procedure exists to prevent.
Record promptly. A delivery counted on Tuesday but entered into the system on Friday is three days of fiction in your inventory.
7. Follow Up
Every open exception gets tracked until it closes. Keep a simple unresolved-exception list — a page in a notebook or a spreadsheet — with the vendor, the issue, what you requested (credit or replacement), and a follow-up date. Review it weekly.
Then verify closure: the credit appeared on the next statement, the replacement arrived and was checked in, the claim was settled. A claim you never follow up on is a donation to your vendor.
Close the loop on the receiving sheet too: when the exception resolves, note the final resolution and date. That closed record is what lets you answer, months later, exactly what happened with that delivery.
Count Before You Look: The Blind Count (and a Simpler Alternative)
Here’s a technique that makes the Count step honest: count the physical delivery before you look at the expected quantity on the paperwork. This is called a blind count.
The operational benefit is straightforward. When the receiver knows the invoice says 12 cases, human nature counts to 12 — a quick glance at a stack, a mental rounding, and the paperwork confirms itself. Counting blind removes that bias: you count what’s actually on the hand truck, write the number down, and only then compare it to the invoice. Shortages the paperwork would have hidden get caught at the only moment they can be proven — while the delivery is still in front of you.
A blind count is a technique, not a law. Nothing requires every small store to do it for every delivery, and there are days it won’t be practical. The way to do it: cover or fold over the quantity column on the packing slip, count the physical goods, write your count on the receiving sheet, then uncover and compare.
When a full blind count is impractical — the driver is waiting, the lunch rush is on — use the lower-friction version: count first, compare second, even if “first” only means counting sealed cartons at the door before glancing at the invoice. Or blind-count the high-value items and spot-check the rest. The minimum viable habit is this: never sign “received in full” before you’ve counted. The signature should follow the count, not replace it.
When Something’s Off: The Receiving Exception Decision Tree
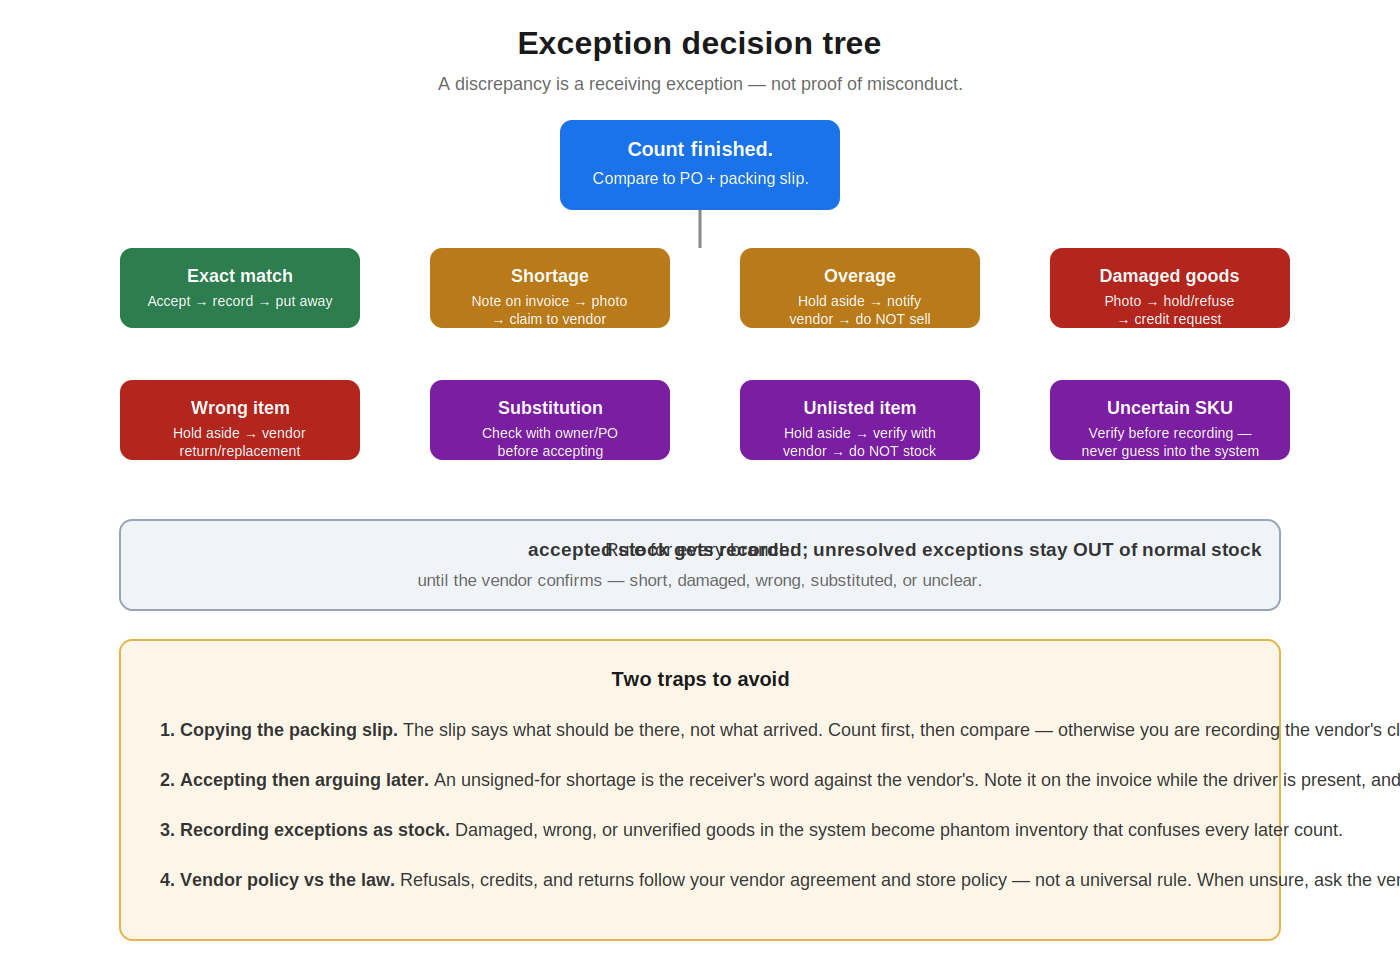
Most deliveries are fine — the framework above handles them in minutes. This section is for the rest. Run every discrepancy through the same decision tree, and treat every discrepancy as what it is: a receiving exception, a process event to handle. It is not proof of misconduct by anyone — not the driver, not your staff, not the vendor. Keep accusation language out of receiving entirely; the tree below resolves the goods, not the blame.
- Exact match → accept and record. The delivery matches the paperwork; the goods go into stock and into your records.
- Shortage (fewer units than ordered) → note it on the invoice while the driver is present and ask the driver to initial it. Photograph the delivery. Contact the vendor promptly for a credit or replacement, and log the claim with a follow-up date.
- Overage (more units than ordered) → hold the extras aside, notify the vendor, and do not sell them. What you weren’t billed for isn’t yours to sell until the vendor says so.
- Wrong item → hold it aside, clearly marked, and arrange a return or replacement with the vendor. Don’t shelve it “for now.”
- Damaged goods → photograph the damage, hold the goods aside — or refuse that portion of the delivery, per your vendor agreement and store policy — and request a credit or replacement.
- Substitution (the vendor sent something different) → check the purchase order and check with the owner before accepting. A substitution you didn’t approve is a wrong item with better marketing.
- Unlisted item (on the truck, on no paperwork) → hold it aside, verify with the vendor, and do not stock it until you know what it is and what it costs.
- Uncertain item or SKU → verify before recording. Never guess an unknown item into your inventory system.
“Hold aside” means physically separated from sellable stock and marked with the date and reason — a taped-off shelf corner works. And note exceptions on the delivery paperwork while the driver is there whenever possible: that’s your timestamped evidence if a claim is disputed later.
The Small-Retail Receiving Checklist
Below is the receiving sheet this whole guide has been pointing at. Use it as-is: print it, copy it into a notebook, or rebuild it as a spreadsheet. One sheet per delivery, kept with the invoice. No signup, no email gate, no download — it’s a table, and it’s yours.
Fill in every header field for each delivery; for the line-level fields, fill in what applies. On a clean delivery, most exception fields stay blank — that’s fine. The sheet earns its keep on the messy deliveries.
| Field | What to write |
|---|---|
| Vendor | Vendor name, as shown on the invoice |
| Delivery date | Date (and time) the goods arrived |
| Invoice / PO number | The invoice and purchase-order reference numbers |
| Receiver | Name or initials of the person who checked the delivery |
| Expected items | What the paperwork says: item/SKU and quantity ordered |
| Received items | What you physically counted: item/SKU and quantity |
| Quantity check | Counted units vs. expected — match, shortage, or overage |
| Condition | Per item or overall: OK, damaged, crushed, wet, tampered |
| Shortage / overage | The difference, if any, in units |
| Damaged items | Which items, how many, and whether you photographed them |
| Substitutions | What was swapped for what, and who approved it |
| Notes | Anything else: driver waited, partial delivery, refused portion |
| Photo / document reference | Where photos or extra documents are kept |
| Action taken | Accepted, accepted with exception noted, held aside, or refused |
| Vendor contacted | Who you spoke to, when, and how (phone/email) |
| Credit / replacement expected | What the vendor promised, and by when |
| Follow-up date | When you will check the claim again |
| Final resolution | Credit received, replacement arrived, claim closed — with date |
| Sign-off | Receiver initials and date |
Work the sheet top to bottom as the delivery happens: header first, counts and checks in the middle, decisions and follow-up at the bottom. File completed sheets with their invoices, and pull the open exceptions into your weekly follow-up review. A stack of completed sheets is also the paper trail that makes vendor claims boring — in the best way.
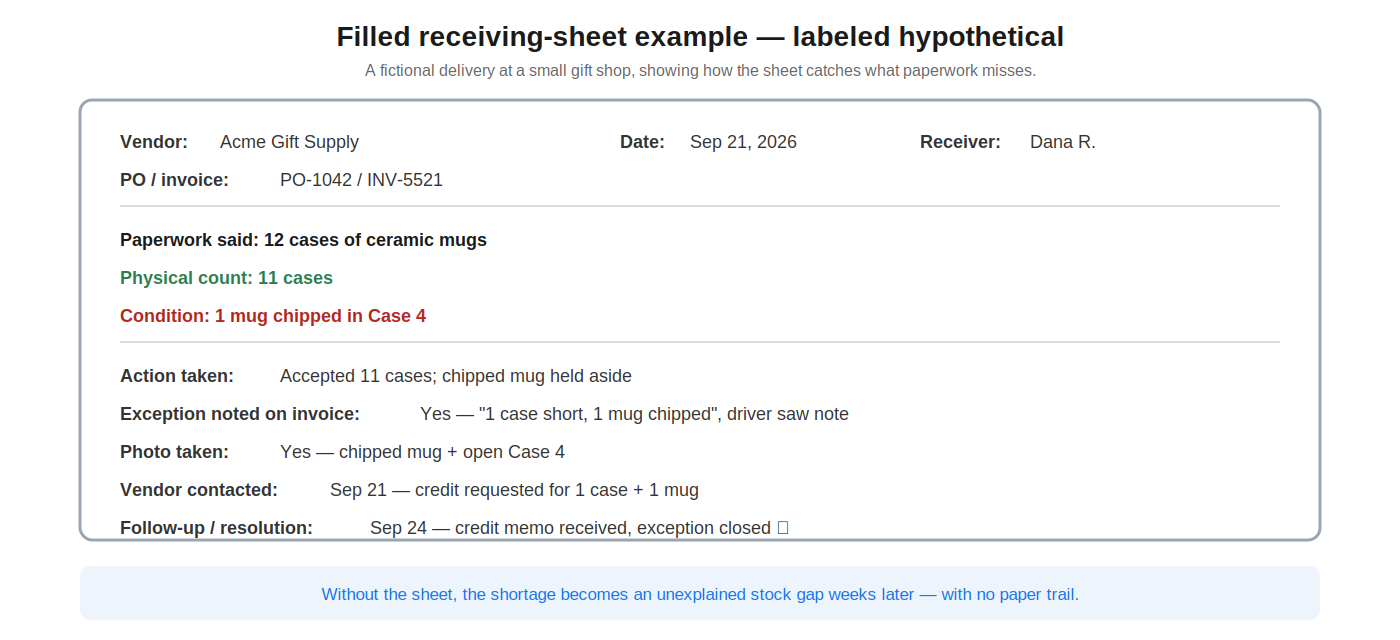
Worked Example: A Tuesday Delivery at a Small Gift Shop
HYPOTHETICAL EXAMPLE — The scenario below is fictional. It illustrates the process step by step; it is not a real delivery, and no real vendor is involved.
Maple & Main Gifts is a fictional two-person gift shop. Tuesday, 10:40 a.m.: a home-fragrance vendor delivers. The packing slip says 12 cases of candles, 12 jars per case. The owner — today’s receiver — works the framework.
Prepare: she clears the back-room corner and has the purchase order ready: 12 cases, one SKU.
Count: she counts the cases on the hand truck before looking at the slip’s quantity column — 11. She writes “11” on the receiving sheet, then compares: the slip says 12. One case short.
Check: she opens the cases. Ten are intact. The eleventh has crushed corners; inside, 2 of its 12 jars are broken, glass and wax through the packaging. She photographs the damaged case.
Document: on the packing slip, while the driver is present, she writes “11 of 12 cases received; 1 case damaged (2 jars broken)” — timed 10:45 a.m. — and the driver initials it. She records the invoice number, her initials, and the photo reference on the receiving sheet.
Decide: the ten good cases are accepted into stock. The damaged case is held aside, marked with the date and reason — not shelved, not “dealt with later.” The missing case becomes a shortage claim.
Record: she updates the shop’s inventory for 10 cases (120 jars) — the counted quantity, not the invoiced 12. The held-aside case is logged as an exception, not as sellable stock.
Follow up: that afternoon she emails the vendor with the invoice number, the driver’s-initialed note, and the photos — credit or replacement for one damaged case and one missing case. She logs a follow-up date one week out. The next Tuesday, the credit appears on the vendor statement; she writes “credit received” with the date on the receiving sheet and closes the exception.
The lesson is process control, not suspicion. Nobody was accused of anything. The shortage was caught because the count came before the paperwork; the damage was credited because it was documented while the driver was there; and nothing unresolved made it onto the shelf. That’s the whole system working.
The Low-Staff Version: Receiving When It’s Just You
Everything above assumes someone can give a delivery ten focused minutes. In an owner-operated shop — one person on shift, no stockroom, customers at the counter — that’s not always true. Here’s the realistic minimum.
Stage, don’t shelve. Mark a receiving spot — even a taped-off corner of the back room — and every delivery lives there until it’s checked. Boxes that go straight to the shelf are boxes you never verified.
Count cartons at the door. While the driver waits, count sealed cartons against the invoice’s carton count — thirty seconds. Do the detailed unit check after the driver leaves, between customers. If all you managed was the carton count, write “carton count only — contents unchecked” on the delivery receipt, and keep the boxes sealed and separate until you finish.
Use the short form when you’re alone: vendor, date, invoice number, cartons expected vs. counted, visible damage, your initials. Fill the full checklist fields only for exceptions. A five-line record beats a perfect system you abandon in week two.
Mark now, check soon. If you can’t check a delivery immediately, mark the boxes “UNCHECKED” with the date and keep them sealed and apart from sellable stock. Check them before they get shelved — unchecked boxes have a way of becoming shelf stock by default.
Bend the signature rule, don’t break it: never sign “received complete” for what you haven’t counted. If all you did was count cartons, write exactly that next to your signature.
One rule survives every staffing level: exceptions never go onto the shelf unresolved. Everything else can flex; that one can’t.
None of this requires enterprise-style segregation of duties — separate people ordering, receiving, and recording. That’s a sound control for a large company and an impossible one for a shop with two employees. The low-staff version trades formal separation for a simpler discipline: one delivery, one receiver, one record, and no unresolved exceptions in the stockroom.
Receiving Is Not Cycle Counting
A distinction worth making explicit: receiving verifies inventory entering the store. Cycle counting verifies inventory already in the store — stock that’s been shelved, sold, moved, and handled for weeks or months. They answer different questions at different moments, and this guide teaches only the first.
That boundary matters because the two jobs get confused. A store that counts its shelves regularly but never checks its deliveries is guarding the vault while the front door stands open. Receiving catches problems at the only moment the vendor is still on the hook; cycle counting catches what happened afterward.
This guide doesn’t teach cycle counting or full discrepancy diagnosis — those are separate subjects. But here’s the connection: clean receiving records make later inventory questions far easier to investigate. When a shortage surfaces months later, a filed receiving sheet lets you rule out “it never arrived” with confidence instead of adding another item to the mystery pile.
Start With the Next Delivery
You don’t need a warehouse system to stop losing money at the back door. You need a habit: one delivery, one receiver, one sheet — and nothing unresolved goes into the stockroom. Prepare, count, check, document, decide, record, follow up.
Sources
The general receiving principles in this guide are consistent with industry receiving guidance, including the receiving procedures published in NAMTA’s toolbox (receivingprocedures2.pdf), which center on checking deliveries against paperwork at receipt and noting exceptions on the delivery documents. Those procedures were written for a different operational context; this guide scales the principles to a small retail store.
Frequently Asked Questions
Who should receive deliveries in a small store?
A designated person for each delivery — the owner, a manager, or a trained employee — and their name goes on the receiving sheet. The title matters less than the discipline: one owner per delivery, every time. In a one-person shop, that’s you. Avoid the “whoever was free signed it” pattern with no record of who actually checked the goods.
Should the person counting see the purchase order before counting?
Not the quantities, if you can avoid it. Counting before looking at the expected quantity — the blind count — keeps the count honest: you write down what’s physically there, then compare. When a full blind count isn’t practical, keep the core habit: count first, compare second, and never sign “received in full” before counting.
What if the driver won’t wait while I count?
Count sealed cartons at the door — it takes seconds — and write “carton count only, contents unchecked” on the delivery receipt if that’s all you verified. Keep the boxes sealed and separate from sellable stock, and complete the unit count and condition check before anything gets shelved. Never sign for a complete delivery you haven’t verified.
How do I document a shortage so the vendor credits me?
Note the shortage on the invoice or packing slip while the driver is present and ask the driver to initial it — that’s your timestamped evidence. Photograph what arrived. Then contact the vendor promptly with the invoice number, the item and quantity short, and the photo. Log the claim, set a follow-up date, and verify the credit appears on your next statement. Claims without documentation are requests; claims with documentation are records.
What if the vendor refuses the credit or replacement?
Stay factual: resend the documentation — the initialed delivery note, the photos, the invoice number — and escalate through whatever process your vendor agreement provides. For repeated problems, weigh the relationship: a vendor who won’t make good on documented shortages is a cost, not a partner. What remedies are available depends on your agreement, your contract terms, and your jurisdiction — this guide can’t promise an outcome, only a paper trail.